Last updated on June 26th, 2023 at 09:11 am
The procedure of installing a washing machine is rather simple, but it does take careful preparation and attention to detail. Each step is essential for a successful installation, including acquiring the required equipment and supplies, measuring the available area, and ensuring correct ventilation, electrical outlets, and plumbing connections. The new washing machine must be set up and leveled, the water supply and drainage must be connected, and the power wire must be plugged in. Regular maintenance and care, together with thorough testing and troubleshooting, can help guarantee your washing machine’s optimum performance and lifespan.
Gathering the Necessary Tools and Materials
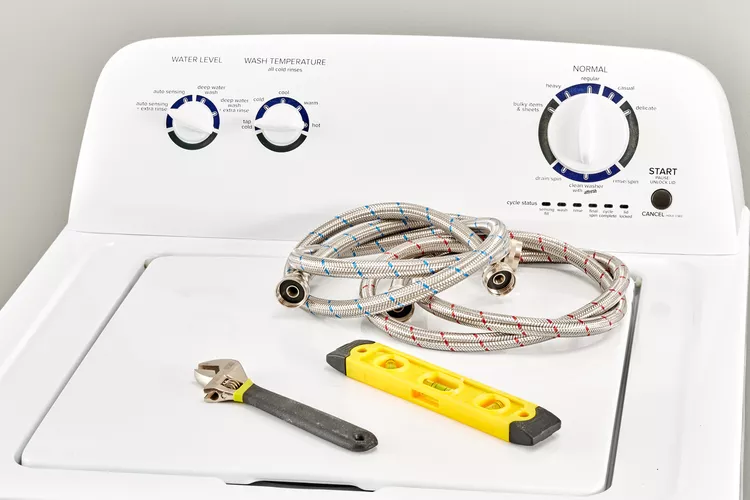
Photo Source: thespruce
You will require the following equipment and materials to install a washing machine:
Washing machine: Ensure that you own the complete washing machine, including the drum, control panel, and hoses.
Hoses for water supply: Typically, washing machines need hoses for both hot and cold water. These hoses should have the proper fittings for your plumbing system and be long enough to reach the water source.
Drain hose: This hose is used to drain the machine’s wastewater. It needs to be long enough
to reach your home’s laundry sink or drain.
Level: A carpenter’s level or a bubble level will help ensure that your washing machine is correctly balanced.
Adjustable wrench: This tool is useful for tightening and connecting the water supply hoses.
Pliers: Pliers can come in handy for adjusting and securing hose clamps or other connections.
Screwdriver: To remove or install any panels or to secure screws on the washing machine, a screwdriver may be required.
Kit for stacking a washer and dryer (optional): If you want to stack your washer and dryer, you might require a kit to hold them in place.
Detergent and fabric softener: Don’t forget to have detergent and fabric softener on hand for your first load of laundry.
Since the equipment and supplies required could differ slightly, it’s vital to examine the exact criteria and suggestions offered by the manufacturer of your washing machine. Additionally, make sure the site where you will put your washing machine has access to electricity and necessary plumbing connections.
Measuring and Preparing the Space

Photo Source: pcrichard
Follow these procedures for measuring the available space and taking ventilation, electrical outlets, and plumbing connections into consideration to ensure a seamless installation of your washing machine and create an ideal laundry room setup:
Sizing the area:
– Make sure the space is clear and free of any objects or obstructions that can hinder the positioning of the washing machine.
– Using a tape measure, determine the room’s width, height, and depth and record the results for future use.
– Pay attention to any architectural details that could have an impact on where the washing machine is placed, such as sticking-out vents, pipes, or cupboards.
Ventilation factors to consider
– To prevent excessive heat and moisture buildup in the laundry room, adequate ventilation is crucial.
– Make sure there is enough ventilation around the washing machine, and leave some space
between it and the nearby cupboards or walls.
– If your washing machine has to be vented, consult the manufacturer’s instructions to ascertain the precise ventilation specifications, and then install any necessary vents or ducts in accordance with those specifications.
A power outlet
– Find the closest grounded electrical outlet that has the right voltage and amperage rating for your washing machine and place it near the installation area.
– Verify the washing machine’s cord length to make sure it can easily reach the outlet.
– If the current outlet is insufficient, have a licensed electrician install a new one that complies with the specifications.
Connecting pipes:
Usually, washing machines need both hot and cold water hookups, so locate the closest water supply lines.
– To make sure the hoses can reach the installation location without difficulty, measure the distance between the water supply lines and the area.
– Inspect the plumbing connections to make sure they are sound and don’t leak, and if required, replace any pipes or fittings that are broken.
– Consult a plumber to establish the required connections if the laundry area lacks dedicated water supply lines.
Additional considerations:
– Make sure the floor can take the load of the washing machine and is structurally sound by taking into account the weight of the machine and its support.
-Make sure you have a stacking kit that is suitable for your appliances if you plan to stack the washing machine on top of a dryer.
– Make sure the drain line can freely flow to an appropriate drain or laundry sink without kinks or obstacles in order to plan for efficient drainage.
You may successfully and efficiently prepare your laundry room for the installation of your washing machine by carefully assessing the available space, taking ventilation, electrical outlets, and plumbing connections into consideration.
Disconnecting and Removing the Old Washing Machine
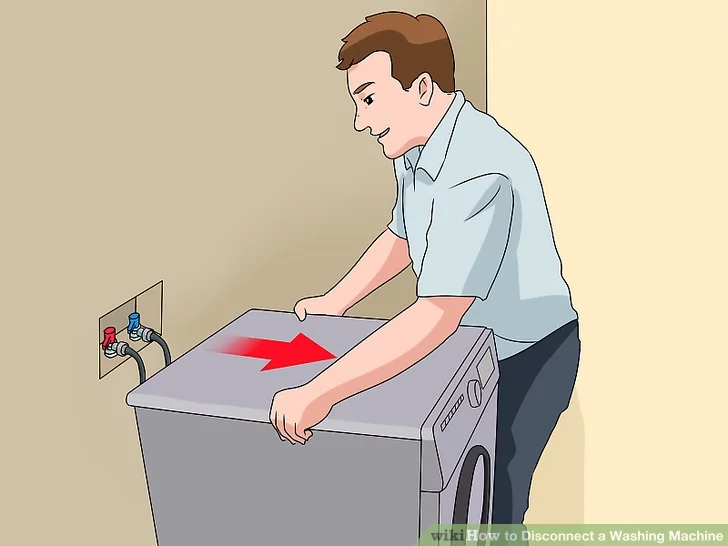
Photo Source: wikihow
Follow these instructions to unplug and remove the old washing machine:
Turn off the power: To make sure the washing machine is entirely unplugged from the energy source, find the electrical breaker or unhook it from the socket.
Turn off the water supply: If there are no specialized valves, you may need to turn off the main water supply for the entire house. Find the hot and cold water supply valves behind or near the washing machine and turn them counterclockwise to stop the water flow.
Disconnect the water supply hoses: Place a towel or bucket beneath the hose connections to catch any water that may leak out as you loosen them with an adjustable wrench. Once the hose connections are free, you can remove the hoses from the washing machine.
Disconnect the drain hose: Again, have a towel or pail ready to catch any water that may spill out while removing the drain line from the drain pipe or laundry sink, which is often placed close to the rear of the washing machine.
Disconnect any extra accessories or attachments: Disconnect any extra attachments that could be linked to the washing machine, such as lint filters or drain extensions.
Get ready for removal: Make sure there is a clear way to move the washing machine and clean the space around it. Enlist the assistance of a friend or family member because washing machines may be awkward and heavy to handle.
Unplug the power chord (if necessary): If your washing machine has a separate power cord that is not hardwired, do so.
Slide or lift the washing machine out: Depending on the type of washing machine and the available space, either slide it out by gently pulling it or lift it carefully with the help of your assistant. Be cautious of any sharp edges or protruding parts that could cause injury.
Clean the area: As soon as the old washer is gone, use the chance to clean the area and clear out any dust or debris that may have gathered.
Dispose of the old washing machine responsibly: Check local regulations for proper disposal methods of appliances. Many areas have designated recycling centers or pickup services for large appliances.
For any further information or safety measures about the disconnecting and removal of your individual washing machine model, don’t forget to consult the manufacturer’s instructions.
Positioning and Leveling the New Washing Machine
Follow these instructions to level and place your new washing machine:
Select the installation location: Make sure the space is well-ventilated and has adequate clearance around the machine for appropriate airflow. Choose a place for your washing machine that is acceptable and satisfies the essential criteria, such as access to electricity, a water supply, and drainage.
Position the washing machine: With a friend or family member’s assistance, carefully move the washing machine into the intended area, being cautious not to drag it or harm the flooring.
Adjust the leveling feet: To make the washing machine level and stable, locate the leveling feet, which are typically located at the bottom corners of the machine. Using a wrench or pliers, turn the feet clockwise or counterclockwise to change the height of each foot.
Check for levelness: Place a carpenter’s level or bubble level on the top surface of the washing machine. Check both the front-to-back and side-to-side levelness. If the machine is not level, make further adjustments to the leveling feet until it is balanced.
Test stability: Gently rock the washing machine from side to side and front to back to check its stability. If it wobbles or feels unstable, re-adjust the leveling feet until the machine sits securely without excessive movement.
Ensure correct spacing: To allow for optimum ventilation and avoid the hoses from being crushed, provide a space of at least 4-6 inches (10-15 cm) between the rear of the washing machine and the wall.
Tighten the connections firmly using an adjustable wrench, but be careful not to overtighten them as this might result in damage once the washing machine has been balanced and positioned appropriately.
Connect the drain hose: Make sure the drain hose is firmly fitted into the drain pipe or laundry sink to prevent leaks or disconnections while in use.
Plug in the power cable: If your washing machine has a dedicated power cord, make sure the outlet is grounded and meets the machine’s voltage and amperage specifications.
Follow the manufacturer’s instructions for initial setup and programming. 10. Run a test cycle. Before adding any laundry, run a test cycle to make sure the washing machine is working correctly.
By carefully positioning and leveling your new washing machine, you can ensure peak performance and reduce any possible complications.
Connecting Water Supply and Drainage
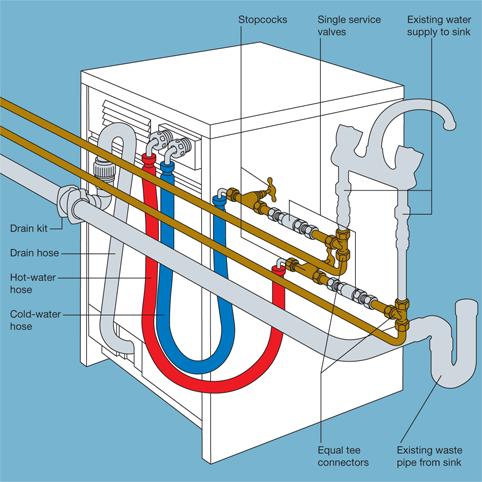
Photo Source: jpsplumbing
The procedures below should be followed in order to connect your washing machine’s water supply and drainage:
Connections to the water supply:
– Find the hot and cold water supply valves close to where your washing machine will be installed; these valves are frequently placed on the wall behind or next to the machine.
– Make sure the connections are secure but not overtightened by connecting the hot water supply hose to the hot water valve and the cold water supply hose to the cold water valve.
– If required, tighten the connections even further using pliers or an adjustable wrench, being careful not to damage the fittings or hoses in the process.
Connection to the drain:
– In your laundry room, find the drainpipe or laundry sink where the wastewater from the washing machine will be drained.
– Connect the washing machine’s drain hose to the drainpipe or laundry sink by inserting it tightly into the drainpipe or placing it in the sink to avoid leaks or dislodging during usage.
– If necessary, attach the hose with hose clamps or zip ties to make sure it stays there while the washing machine is running.
Perform a leak test:
– After connecting the water supply and drainage, switch on the valves for the water supply and check for leaks. Carefully examine the connections, including the hose fittings and drainpipe, for indications of water leakage.
– If you discover any leaks, stop the flow of water right away, tighten any loose connections, and consider using a plumber’s tape or sealant to make a watertight seal.
Carry out a test cycle
– Plug the washing machine in and follow the manufacturer’s directions to run a test cycle after making sure the water supply and drainage connections are tight.
– Keep an eye on the machine throughout the test run to check that the water is flowing into the drum properly and that the drainage is free of leaks and obstructions.
If you have any issues or questions regarding how to connect your washing machine’s water supply and drainage, you should refer to the manufacturer’s instructions or think about getting expert plumbing help to guarantee a secure and effective installation.
Connecting the Power

Photo Source: aquatek
The procedures below should be followed in order to connect your washing machine’s power supply:
Find the power cable: The washing machine’s power cord is normally found towards the rear of the appliance, either near the top or on one side.
Ensure the washing machine is in the correct position: Make sure the washing machine is positioned in its designated location and is level and stable.
Access the power outlet: Locate a nearby electrical outlet that is grounded and meets the voltage and amperage requirements specified by the manufacturer. Ensure the outlet is easily accessible and not obstructed.
Unravel the power cord: If the power cord is wound or bundled, carefully unravel it, ensuring there are no kinks or knots that could restrict the cord’s movement.
Plug in the power cable: Make sure the plug is firmly inserted into the outlet and that it fits snugly. Align the prongs on the power cord with the appropriate slots on the electrical outlet.
Verify power connection: After plugging in the power cable, make sure there are no exposed or loose wires, avoid putting undue strain on the cord, and make sure it is not pinched or caught between the washer and the wall.
Turn the power on: Find the power switch or button on the washing machine, which is often found on the control panel, and press or flip it to turn the power on.
Check the washing machine: After plugging in, the appliance should be powered on and ready for use. Follow the manufacturer’s instructions to set and run a test cycle to make sure everything is working as it should.
Note: It is advised to seek the advice of a licensed electrician for the correct installation process if your washing machine is intended to be hardwired rather than linked through a power cable.
When connecting the power supply, safety should always come first. If you have any questions or worries, check the manufacturer’s instructions or think about getting help from a licensed electrician to guarantee a secure connection.
Testing and Troubleshooting

Photo Source: thespruce
Use these methods to test and troubleshoot your washing machine:
Read the manufacturer’s instructions: This will provide you correct information and assistance relevant to your washing machine model. Become familiar with the testing and troubleshooting processes described in the manufacturer’s handbook.
Initial test run: Run an empty test cycle before loading any laundry to check the washing machine’s fundamental functionality. Follow the manufacturer’s instructions for starting a test cycle. Throughout the cycle, keep an eye on the machine and note any unusual noises, vibrations, leaks, or error codes.
Appropriate loading: To avoid subpar performance and potential problems, load the washing machine to the manufacturer’s suggested load capacity while putting it through its paces.
Monitor performance: Keep an eye on how the machine performs throughout the test cycle, keeping an eye out for any unusual behavior like excessive noise, unbalance, extended cycle durations, or failure to finish cycles. You should also take note of any error codes that are shown on the control panel.
Water supply and drainage: Make sure the water supply hoses are securely connected, that there are no leaks or problems with the water pressure, and that the drain hose is inserted into the drainpipe or laundry sink without any obstructions before beginning the test run.
Electrical connections: Confirm that the power supply is stable and consistent throughout the test cycle. Ensure the power cord is securely plugged into a grounded electrical outlet, and there are no loose or exposed wires.
Troubleshooting common problems: Consult the manufacturer’s manual for troubleshooting advice if you run into any issues during testing. Common problems can include incorrect water temperature, unbalanced loads, error codes, or problems with particular wash cycles. Once the problem has been identified, take the advised actions to fix it.
Professional help: If you are unable to identify or fix the issue on your own and the issue persists, it may be necessary to get in touch with the manufacturer’s customer service or arrange a service appointment with an experienced technician, who will have the knowledge to identify and fix more complicated issues with your washing machine.
When inspecting and troubleshooting your washing machine, keep in mind that safety should always come first. If you run into any electrical or mechanical difficulties that you are unsure how to manage, get expert assistance to reduce the chance of getting hurt or causing more damage to the appliance.
Appropriate Upkeep and Maintenance

Photo Source: urbancompany
Here are some crucial maintenance suggestions to help you take good care of your washing machine and maintain maximum operation.
Read the manufacturer’s manual:
For the best maintenance, familiarize yourself with the precise maintenance recommendations supplied by the manufacturer for your washing machine model.
Consistent cleaning:
– Clean the drum: Using a moist cloth or sponge and mild detergent if necessary, regularly clean the washing machine’s drum to remove any lint, grime, or residue.
– Clean the detergent dispenser: Remove and clean the detergent dispenser regularly to prevent clogs or buildup. Refer to the manufacturer’s instructions for proper cleaning methods.
– Clean the filter: To ensure effective drainage, certain washing machines feature a filter that collects lint and debris. Clean it occasionally as directed by the manufacturer.
Prevent overloading:
Adhere to the manufacturer’s specified load capacity recommendations. Overloading the machine can put stress on its parts, decrease cleaning effectiveness, and even result in damage.
Use the proper detergent:
Make sure to use high-quality, HE (High-Efficiency) detergent that is made particularly for washing machines. Be sure to use the recommended amount of soap per the load size and water hardness recommendations provided by the detergent manufacturer.
Inspect water supply hoses:
To avoid water damage and potential flooding, regularly check the water supply hoses for any signs of wear, fractures, or leaks and replace them every 3-5 years, or as the manufacturer advises.
Level the machine:
Regularly check the washing machine’s levelness and, if necessary, adjust the leveling feet to restore appropriate balance and lessen vibrations while in use.
Ventilation:
To avoid excessive humidity and moisture accumulation and to prevent the formation of mold and mildew, make sure the laundry room is well-aired.
Use the proper cycles:
Choose the correct wash cycles and settings for various fabric kinds and filth levels, and stay away from using too much heat on fragile or sensitive goods that need careful handling.
Address problems right away:
If you hear any weird noises, vibrations, leaks, or see any error codes, fix them right away. Consult the manufacturer’s troubleshooting manual or get help from customer care.
Schedule expert maintenance:
To guarantee your washing machine operates at its best, consider scheduling routine professional maintenance and inspections. expert technicians can see possible concerns and take care of them before they worsen.
By keeping your washing machine in good shape, maximizing its efficiency, and extending its lifespan, you can improve the quality and dependability of your laundry results.
Conclusion
In conclusion, installing a washing machine requires careful thought, preparation, and attention to detail. By gathering the required tools and materials, measuring the space, and making sure that there is adequate ventilation, electrical outlets, and plumbing connections, you can create an ideal setup. Disconnecting and removing the old washing machine should be done safely and responsibly. Positioning and leveling the new washing machine is crucial for optimal performance.
Frequently Asked Questions
1: How long does it take to install a washing machine?
On average, it may take around 1 to 2 hours to finish the installation of a washing machine, but this can vary depending on factors like the complexity of the installation, the availability of essential equipment and supplies, and familiarity with the procedure.
2. Am I able to install a washing machine myself?
Yes, if you have basic DIY skills and carefully follow the manufacturer’s instructions, you can install a washing machine without professional help. However, if you are unsure about any aspect of the installation or run into problems, it is advised to seek professional assistance to ensure a safe and proper installation.
3. What should I do in the event that my washing machine leaks after installation?
Turn off the water supply valves and unplug the appliance if you discover a leak after installation. Next, check the water supply hoses for any loose or damaged connections, make sure they are securely fastened and not kinked. Next, check the drain hose for any obstructions or damage. If the problem persists, get in touch with the manufacturer’s customer support or a qualified technician for more help.
4: Are there any unique factors to take into account while setting up a washing machine on an upper floor?
Washing machines can be heavy when fully loaded, so make sure the floor can support the weight before installing one. You should also think about using anti-vibration pads or mats to reduce noise and vibrations that might affect the floor and nearby rooms before installing a washing machine on the upper floor.
5: During installation, may I utilize the original water supply hoses?
Generally speaking, new water supply hoses with proper fittings are advised to be used in place of old ones during installation because new hoses are more reliable and decrease the likelihood of unexpected problems. It is also advisable to buy and use new water supply hoses specifically made for washing machine installations because old hoses may deteriorate over time, increasing the risk of leaks and potential water damage.