Estimated reading time: 12 minutes
Last updated on June 23rd, 2026 at 07:29 am
You know the feeling. You sit down to start a project, and before you’ve even cut a single piece of paper, you’ve spent twenty minutes hunting for your bone folder, discovered the scissors are MIA (again), and knocked over a jar of buttons that’s now rolling under the table. The creative mood? Gone.
A chaotic craft room doesn’t just look bad — it actively gets in the way of making things. And if you’ve tried organising before and it fell apart within a week, the problem probably isn’t your dedication. It’s that most storage advice wasn’t designed with craft supplies in mind. Cardstock warps. Ribbon tangles. Embellishments multiply like gremlins. Generic organisation tips just don’t hold up.
These craft room organizing hacks are built around one core principle: if you can’t see it, you won’t use it. That single idea changes everything about how a craft space should be organised.
Start Here: The Three Changes That Make the Biggest Difference
Before you buy a single storage bin, focus on these three things. They’re the highest-impact moves, and they work for almost any craft room — big, small, dedicated, or squeezed into a corner.
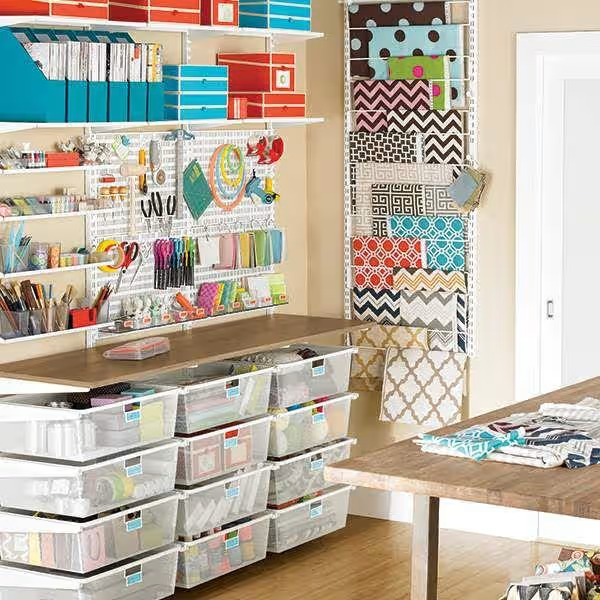
1. Get everything off flat surfaces. Flat surfaces in craft rooms attract clutter the way a magnet attracts metal shavings. The moment you clear your desk by putting things into drawers, you lose visibility — and visibility is everything. Move supplies up onto walls and open shelving where you can actually see them.
2. Switch to clear containers everywhere. Not because they look nice (though they do), but because a crafter who can’t see their supplies will unconsciously stop using them. You’ll buy duplicates of things you already have, forget about materials that could spark your next project, and dig through opaque bins in frustration. Clear is non-negotiable.
3. Group by project type, not category. Traditional organising says “put all the tape together.” But if you’re a scrapbooker, your washi tape, stamps, and cardstock are all part of the same workflow — they should live near each other. Think about how you actually work, not how a storage catalogue suggests you should.
Once you’ve made these three shifts, everything else gets easier.
Go Vertical — Your Walls Are Doing Nothing
Craft rooms tend to run out of floor space quickly, especially smaller ones. The fix isn’t more furniture. It’s your walls.
Pegboards Are Worth the Commitment
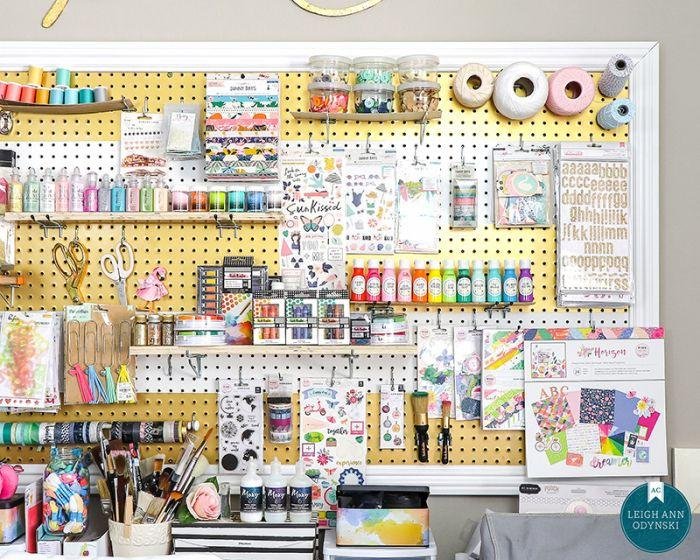
If I had to pick the single most useful thing in a craft room, it’d be a pegboard. The IKEA SKÅDIS is the go-to for most crafters — it’s affordable, the accessories are interchangeable, and you can rearrange it as your needs change. Hang your scissors, rotary cutters, rulers, and anything you reach for constantly. When tools are right there on the wall, at eye level, they actually get put back where they belong.
Give it at least half a wall. A tiny pegboard in the corner isn’t going to change much. Make it a feature.
Floating Shelves for Supplies You Want to See
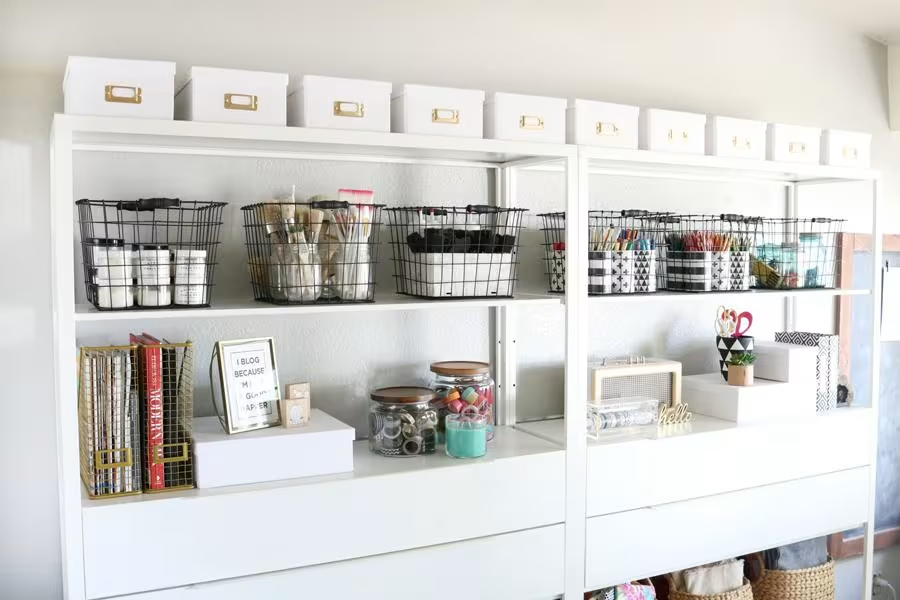
Open shelving is underrated in craft rooms. A row of floating shelves can hold labelled clear bins, jars of supplies, or baskets for bulkier materials — all visible at a glance, all accessible without opening a cabinet. If your space is limited, even one well-placed shelf above your desk changes the game. For more ideas on maximising shelving potential, essential racks, shelves and drawers are worth exploring.
Over-the-Door Organisers
The back of a door is premium real estate most crafters completely ignore. A clear over-the-door shoe organiser can hold stamps, dies, small tools, bottles of paint, and all the small stuff that usually ends up floating around the desk. It frees up shelf space and keeps frequently-used items within reach without taking up a single inch of floor or counter space.
The Visibility Rule: If You Can’t See It, You Won’t Use It
This is the organising principle that separates a craft room that works from one that looks organised but secretly isn’t.
Clear Bins Over Opaque, Every Time
Stack clear acrylic bins on shelving and label them by supply type. The labels aren’t just for looking tidy — they actually help you put things back consistently, which is what keeps the system running. A label maker is a better investment than most storage products.
For smaller embellishments (brads, eyelets, gems, tiny die cuts), small stackable acrylic drawer units are worth their weight in gold. The kind with individual shallow drawers — each one clearly visible, each one holding one category. When you can see everything, you stop buying duplicates and you start reaching for materials you’d forgotten you had.
Colour-Coding Actually Works
It sounds a bit fussy, but organising by colour isn’t just aesthetic. Crafters often work visually — you’re scanning for the right shade, not reading a label. Keeping your cardstock sorted by colour, or grouping your washi tape by tone, means you can make decisions faster. It also makes restocking intuitive: you can see at a glance when you’re running low on something.
Mobile Storage for the Way You Actually Work
Not everything should be fixed in place. One of the most underrated craft room organizing hacks is the humble rolling cart.
A three-tier rolling cart (the Alex-style carts from IKEA, or the now-iconic Target versions) can hold an entire category of supplies and go wherever you need it. Set it up next to your sewing machine when you’re sewing. Roll it to the table when you’re doing layout work. Put it beside the Cricut when you’re cutting vinyl.
One honest caveat: rolling carts only work if you keep them somewhere accessible, not jammed in a corner behind a door. If the cart is inconvenient to reach, it’ll just become a dumping ground for things you don’t know where to put. Position it where it’s genuinely in your workflow.
Smart Hacks for Specific Craft Supplies
Ribbon: The Tangle Problem
Ribbon is one of the most annoying things to store in a craft room. In a drawer or box, it tangles, frays, and gets crushed. The solution is always vertical.
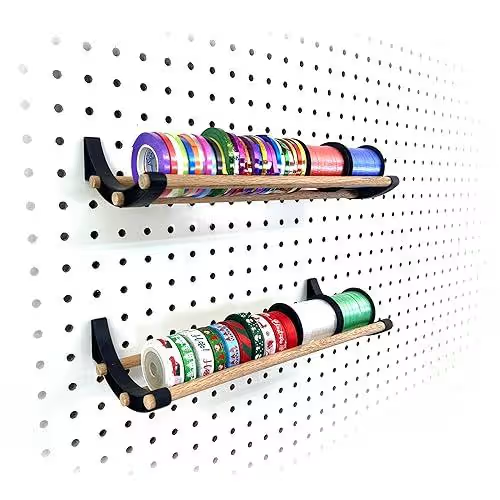
Thread ribbon spools onto a wooden dowel mounted horizontally on the wall, or use a dedicated ribbon organiser where each spool sits in its own slot and you can pull the end through to cut without removing the whole spool. If you’re on a budget, an empty paper towel holder on a tension rod inside a cabinet works surprisingly well. The goal is individual spools that don’t touch each other.
Cardstock and Vinyl (The Cricut User’s Headache)
Cardstock warps when it’s stored standing vertically for too long in humid conditions, and it becomes impossible to work with when it’s been sitting in a deep pile. The best solution is a rolling file cart with hanging folders, one per colour or type, stored upright but supported. For vinyl rolls, a wall-mounted paper towel holder or a freestanding rack keeps them accessible and roll-free.
If you store a lot of Cricut mats, a dedicated slot system (even a homemade cardboard divider in a drawer) keeps them flat and means you’re not unstacking a pile every time you need the light grip mat.
Yarn and Fabric: The Takeover Artists
Fabric has a special talent for expanding to fill whatever space you give it. The only system that genuinely works long-term is folding everything consistently (the KonMari fold for fabric is legitimately useful here) and storing it by colour in clear bins or on open shelves.
Yarn is best stored in individual clear bags or small baskets — one project’s worth per bag — so you can grab what you need without unravelling anything. For a larger stash, a wall-mounted wine rack holds balls of yarn beautifully and keeps them untangled. If you want your space to look put-together too, these kinds of display-friendly storage choices also double as home decor accessories that make the room feel curated.
The Small Embellishment Problem
This is where most craft rooms quietly unravel. There’s always a collection of buttons, brads, gems, sequins, or charms that doesn’t have a proper home — so it ends up in a catch-all dish or scattered across the desk. The fix is small, individual containers with lids. Stackable acrylic boxes work; so do bead storage cases with adjustable dividers. The key is that each category gets its own dedicated space, not a shared bin where everything mingles.
The In-Progress Project Problem
Here’s something almost no craft organisation article addresses: what do you do with the half-finished project?
Every crafter has one (or ten). The half-sewn quilt block. The scrapbook layout that needs more photos. The Cricut project that’s mid-cut while you wait for supplies. If you put it all away, you lose momentum and may never come back to it. If you leave it on the desk, it takes over and the room looks chaotic.
The solution is a dedicated in-progress zone. This could be a specific shelf, a labelled flat-file drawer, or a rolling cart that you assign specifically to works in progress. The rule is simple: only active, current projects live here. Completed projects get put away; abandoned ones get a decision (finish or release?).
A few cheap alternatives that work well: a flat garment rack for large fabric projects, manila envelopes labelled by project name for paper crafts, or a divided shelf with one section per ongoing project.
Having a designated place for in-progress work means your main workspace can actually be cleared between sessions — which is what makes the difference between a room that stays organised and one that slides back into chaos.
Keeping It Tidy: The Five-Minute Reset Habit
This is the part nobody talks about: organisation isn’t a one-time event. The room won’t stay organised by itself. But it also doesn’t need to be a major production to maintain.
The five-minute reset is exactly what it sounds like. At the end of every crafting session, spend five minutes putting things back where they belong. Not deep-cleaning. Not reorganising. Just returning what you used to its home. This is only possible if every supply has a home — which is why the systems above matter.
A few things that help the reset actually happen: keep a small “return bin” on the desk for things you’re not sure where to put mid-project (deal with it during the reset, not during the flow of creating), keep scissors and frequently-used tools always back on the pegboard, and don’t let the in-progress shelf overflow.
The crafters who have genuinely tidy rooms aren’t naturally tidy people — they just have good systems and a simple maintenance habit. The space you’re trying to create isn’t about being perfect. It’s about having a room that works for how you create, so you can spend less time organising and more time actually making things.
If you’re also working on getting other areas of your home under control, these same principles apply beautifully — check out home organization ideas for room-by-room strategies, or storage living space ideas if you’re working with a smaller footprint. And if you’re also trying to sort out a kids’ crafting area alongside your own, kids room organizing hacks has some genuinely useful ideas worth pairing with these.
Frequently Asked Questions
What’s the best storage for a small craft room?
In a small craft room, vertical storage is your best asset. Use wall-mounted pegboards, floating shelves, and over-the-door organisers to keep supplies visible and accessible without eating up floor space. A rolling cart that can be moved around as needed is more useful than fixed furniture in a tight space. Prioritise clear containers so you can see everything at a glance without digging.
How do I organise craft supplies I can’t see?
If supplies are hidden in opaque bins or deep drawers, swap them for clear stackable containers and label everything. Move as much as possible to open shelving or wall storage. The guiding principle is simple: visible supplies get used; hidden supplies get forgotten and repurchased.
What is a pegboard used for in a craft room?
A pegboard gives you flexible, customisable wall storage for tools and supplies you use regularly. You can hang scissors, rulers, tape dispensers, ribbon, small baskets, and more — all visible, all within reach, and all easy to rearrange as your needs change. The IKEA SKÅDIS system is one of the most popular options because the accessories are interchangeable.
How do you store works in progress in a craft room?
Designate a specific shelf, drawer, or rolling cart solely for in-progress projects. Keep only active, current projects there. Use labelled flat envelopes or project bags for paper crafts, a garment rack for sewing projects, or divided shelving with one section per project. The goal is a dedicated space so your main workspace can be cleared between sessions.
How do I organise a craft room on a budget?
Start with what you already have: mason jars for brushes and tools, shoeboxes as drawer dividers, cardboard tubes for ribbon storage. Thrift stores often have glass jars, small trays, and baskets that work perfectly. Invest budget strategically in one good pegboard and a set of clear stackable bins — these two things deliver more organisational impact than anything else. If you’re looking for broader budget-friendly home upgrades, how to upgrade your home has practical ideas that won’t break the bank.
What should every craft room have?
A dedicated workspace with good lighting, a pegboard for frequently-used tools, clear storage containers for supplies, a rolling cart for flexibility, open shelving for visibility, and a designated spot for in-progress projects. Beyond the basics, the most important thing is a system tailored to the specific crafts you do — a sewist’s needs are very different from a scrapbooker’s or a painter’s.